|
DxO Optics Pro 3.5
Other essays in this series
1 – So many Raw converters, so little time
In my opinion, as of January 2006 there are three main categories of Raw converters:
1- Raw converters that focus on creating a good raw conversion, leaving the final processing to be completed in Photoshop. This category includes Raw Developer, Capture One, Pixmantec RawShooter, Adobe Camera Raw and several others.
2- Raw converters that focus on doing it all, from conversion to post-processing and printing, even including image cataloging. At this time this category has two contenders: Apple Aperture and Adobe LightRoom. Both are offered only for Macintosh at this time, indicating that these applications are currently targeting primarily professional graphic artists, the large majority of whom work on Macintosh computers.
3-Raw converters that focus on achieving image perfection, going as far as correcting lens defects. At this time, there is only one contender in this category: DxO Optics Pro 3.5, which is the subject of this review.
No matter which of these 3 categories they belong to, Raw converters make a significant difference in the quality of the converted image. Just like each chemical developer produces a different development --some giving a finer grain to the image for example, and others creating more or less contrast, or a softer development, or a larger density range-- each Raw converter creates a unique converted image.
In a way, doing a fine Raw conversion can be approached as the demonstration of fine craftsmanship. And if so, we know that fine craftsmanship is time consuming, and that obtaining quality results means spending more time on the processing of the image. In my instance, where only the finest image will do, I do not mind spending more time on the conversion if this results in a visible difference in the final image. Craftsmanship may be time consuming, but in my estimate it is time well spent.
3-The search
I have done my share of searching in regard to Raw converters, having tested most the leading Raw converters on the market today, including all the converters I just mentioned in my discussion of the 3 Raw converter categories above. Each converter takes a different approach to raw conversion, with the more recent contestants focusing as much on workflow, printing and image cataloging as on raw conversion.
However, there is one thing that is attempted by only one Raw converter, and that is to correct for aberrations and defects introduced by the lens and camera combination. In this regard DxO is unique because it not only converts the Raw files but also fixes the various defects introduced by the lens and camera combination. With other raw converters, if we want to correct these defects, we have to do this during post-processing, or post-Raw-conversion if you prefer.
Why postpone a step that is better performed prior to conversion, when you are working not on the image but on a single-channel file which is essentially numbers and not colors and shapes yet? After all, it is at this stage that the most effective and highest quality correction can be made.
This is the exact approach chosen by DxO in their Raw converter which is now at version 3.5. The lens correction engine, as it is called, was originally developed by DxO to conduct performance tests on lenses. This software is called DxO Analyzer. It was later applied to Raw conversion and used in DxO Optics Pro, DxO’s raw conversion engine. While a lens-testing program looks for differences between the perfect optical output and the actual optical output for each specific lens-body combination, DxO Optics Pro goes one step further by proceeding to correct the defects --distortion, aberration, and so on-- introduced by each specific lens-body combination.
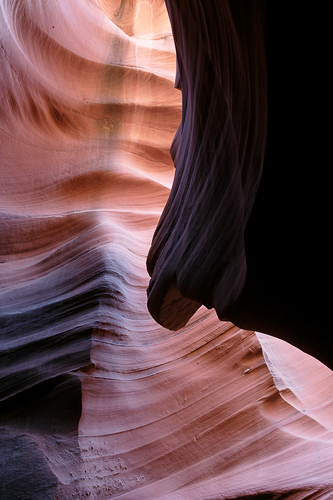
In the Darkest Recess
This dark and cramped location was photographed at ISO 3200.
I could not set up a tripod because of the cramped settings. I had my back pressed on the canyon wall,
and I needed a small f-stop to give me maximum depth of field. I used DxO Noise engine to remove digital noise generated
by the high ISO. I completed noise removal in Noise Ninja. Noise artifacts are hardly visible in the final print.
4-Two-stage raw conversion
What I found in my study of raw converters is that I end up using several different converters depending on the kind of conversion I am looking for and on the specific needs of the image I am working with. In this regard DxO offers an interesting advantage because it gives you the option of exporting a file processed in DxO in DNG format. DNG is a universal format created by Adobe, format that can be read by an increasingly larger number of raw converters, among which are Adobe Camera Raw and several others.
What this means is that you can use some of the unique features of DxO on your file, then continue the conversion in a different converter if you like, provided it can import files in DNG format.
5- Optical image defects correction
Let us now look at some of the unique features offered by DxO 3.5. DxO features several correction modules, also referred to as “engines”. These include lens correction, noise removal, highlight recovery and exposure compensation.
Note that in describing these different features I use excerpts from several DxO technical reports. I decided to use this approach rather than attempt to re-write this technical data myself because these reports are written by DxO engineers who, understandably, know the software inside and out and are able to explain how it operates much better than me.
At the top of the list of features offered by DxO is the lens correction feature. Other lens-correction software does exist, but DxO is the only software that corrects lens defects prior to raw conversion.
Based on sophisticated models of camera and lens performance, DxO automatically removes:
A-lens distortion and vignetting
B-lens softness
C-chromatic aberrations
Let’s look at these 3 areas in detail:
A-Pincushion or barrel distortion
There are four main reasons why DxO distortion correction differs from other tools:
1-DxO’s distortion correction model is based on a very high number of variables, not just 3 or 4 as in other solutions. For example, DxO takes into account focusing distance, which is a critical variable for distortion, especially at close range.
2-DxO corrections are based on the real, measured distortion of the camera body and lens that was used to shoot the image. It therefore takes into account the relevant parameters that determine distortion: optical formula and design, focal length, focusing distance, aperture, etc…
3-DxO corrects distortion automatically in a matter of seconds. You can correct dozens of images taken at different settings, with different lenses and cameras in the time it takes to make a cup of coffee. No human intervention is required, apart from deciding which images you wish to correct.
4-DxO can correct complex distortions that are neither totally barrel nor totally pincushion. Even if the maximum distortion is not on the edges of the image, or if the distortion is non-linear, DxO will provide the proper correction. Again, all this is automatic, freeing up your time to do other things.
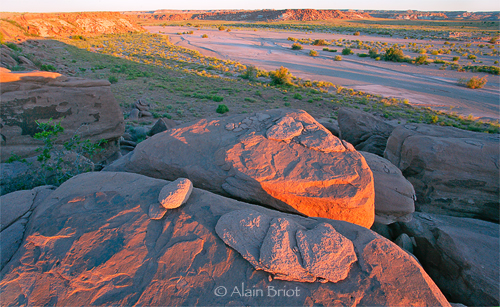
Palavayu Sunrise
This image was taken with the Canon 17-40 f4 zoom which distorts the image corners.
I used DxO 3.5 to correct this lens defect successfully.
What about tilt-shift lenses?
DxO does not support tilt-shift lenses. This is because once the lens has been tilted and shifted, there is no way for DxO to know the precise optical characteristics of the imaging device. None of the tilt–shift information is stored with the file, and DxO cannot correct the imaging defaults of a device whose characteristics are unknown.
B-Lens Softness correction
Lens softness’ is the intrinsic degradation of sharpness introduced by an imaging device (camera body plus lens). In image processing terms, this is a local, color-channel dependent, anisotropic convolution of the original image, which results in a 'blurry' image. In terms of image spatial frequencies, ‘blurriness' refers to how well low spatial frequencies are reproduced in the image. You may be familiar with these concepts if you are familiar with MTF (Modulation Transfer Function) curves. DxO Labs has developed a unique unit called the BxU (Blur eXperience Unit) which is a mathematical way of describing this 'blur'. Reducing the ‘lens softness’ or 'blur' or 'lack of sharpness' means performing local, color-channel dependent and anisotropic deconvolution of the image produced by the camera. Furthermore, DxO deblurring uses a complex contextual approach taking into account both local noise and local detail level in the image. As a result, deblurring will be automatically reduced in uniform areas (like a pure blue sky.), but increased in a detailed zone.
DxO Lens Softness is different from Unsharp Masking. DxO Lens softness correction is automatically adapted to the lens intrinsic softness of each shot, which is field, color and captures parameters dependent (for example, image corners will be sharpened differently than image center). It brings each image to a nominal and constant level of softness.
Since "good" softness or sharpness is a subjective matter, DxO allows the user to change this nominal level of softness by two ways. First, via the Lens Softness slider, which gives you direct control on a constant final level of softness. Second, via the classic USM slider, which allows you a classical control of sharpness and which is particularly useful for adding extra sharpness on images to be printed.
Generally, you set Lens softness once for all the images taken with the same lens. You then set the USM individually for each image and output size.
C-Lateral chromatic aberration & color fringe
DxO corrects most unwanted color fringes, including Lateral Chromatic Aberration, an optical phenomenon whereby different wavelengths of light do not hit the focal plane in exactly the same place, thus producing color fringes on either side of an image element.
DxO also corrects color fringes due to other phenomena such as longitudinal CA, various sensor and optical phenomena loosely grouped under the term ‘Purple Fringing’, etc.
All the corrections in DxO are based on the actual measured defects produced by the capturing device. All relevant parameters such as focal length, ISO, aperture, etc. are taken into account, both when the defects are measured and again when producing the corrected image.
DxO corrects image defects no matter how complex or non-linear they are. DxO provides automatic correction with no human intervention required. This can be thought of as like having a higher-end capturing device that produces better original images. You can batch process hundreds of images and get corrected images almost instantly and completely automatically.
6- DxO 3.5 now includes all the lens modules
DxO Lens Modules are software components that contain a mathematical model of a camera/lens combination. DxO Lens Modules are used by DxO Optics Pro to correct optical defaults in the image. There are currently 250 DxO Lens Modules available.
Previously only one DxO Lens Module was included in the initial purchase of DxO and additional DxO Lens Modules had to be purchased separately.
On October 4th, 2005, DxO launched a new licensing model that gives DxO users unrestricted access to all DxO Lens Modules. You no longer need to buy individual lens modules. Instead, all the lens modules are included in the software price.
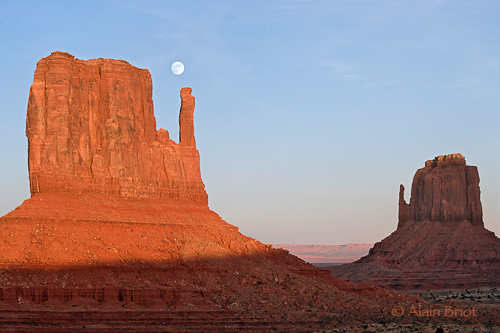
Monument Valley Moonrise
I consider this image to be a relatively "straight" conversion from DxO. The only area where some work needed
to be done was the contrast of the scene, in particular the shadowed area at the base of the Mittens.
This was easily taken care of with DxO Lighting.
7-DxO Lighting
DxO Lighting is a unique local exposure and dynamic range optimizer which automatically replicates analog film techniques known as dodging and burning. DxO Lighting brings out shadow detail while preserving highlights, textures, colors and a natural look.
DxO Lighting provides an outstanding degree of correction by automatically optimizing the local exposure and the dynamic range of the picture. This translates into:
- locally bringing light into the image wherever it is missing such as in the case of backlight, weak flash fill, excessive contrast, etc
- improving image contrast in low-contrast images
- improving macro detail
DxO Lighting automatically segments the image into zones of different brightness, which are then individually optimized in terms of light and contrast. Although DxO Lighting works automatically, the settings can be manually adjusted in the DxO Lighting control panel.
In addition, DxO Lighting automatically restores highlight details in some raw images, as long as none of the color channel has been oversaturated or clipped. When this feature is activated, DxO will automatically set the exposure compensation to the appropriate level.
8-DXO Noise Engine
DxO Noise Engine automatically reduces image noise by up to two stops while preserving maximum detail. For example, an image shot at 1600 ISO and processed in DxO should present a noise level equivalent to an image shot at 400 ISO.
DxO noise reduction is based on a profile describing the noise profile of a given sensor at a given ISO. It ensures optimal noise removal as it takes into account Raw conversion settings like exposure compensation that have a significant effect on noise. In short, this noise correction is tailored to each camera model.
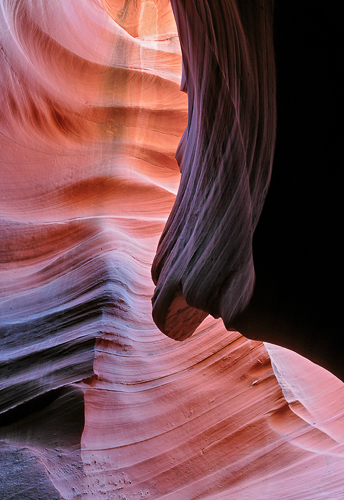
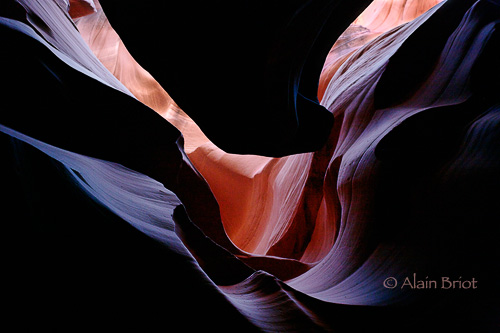
Antelope Canyon
This is the same photograph as above, but straight out of DxO,before any additional
image processing was done in Photoshop. n my workflow, this is as close as I need
to get in any Raw converter regarding color and contrast adjustments
9- DxO at work
All the photographs in this review were created with my Canon 1DsMk2 and the Canon 17-40 f4 and 70-200 f4 and converted in DxO 3.5 Elite. Processing was completed in Photoshop CS2.
In my view DxO is not necessarily a Raw converter designed for production work. I see it more as a Raw converter for quality work than for quantity work. For me, this fits within my personal goal, which is to create a relatively small number of high quality images.
As with any new software with extended capabilities, DxO does take some time getting used to. The quality of the results one can expect from DxO are directly related to the settings made in DxO. Because the DxO interface is quite different from other Raw converters interface, because DxO offers some unique adjustments, and because these adjustments are quite numerous, time needs to be spent working in DxO and trying the different options before one becomes familiar with the software’s capabilities. I recommend that you start with the automatic settings options in DxO, convert one or several photographs that way, and examine the resulting images in Photoshop. Then, based on your evaluation, modify these automatic settings to fit your needs. I personally follow this approach with good results. It gives me a base to start from rather than venture into settings that may affect the image negatively.
I also do not add sharpening or increase color saturation during Raw conversion. I follow this approach with all Raw converters, not just with DxO. I prefer to make these adjustments in Photoshop.
What I do use in DxO are lens correction, noise removal and the exposure control, including highlight recovery and shadow control. I find the curves dialog box in DxO to be very useful for this purpose, as it allows me precise control of the black and white points. I use it in combination with the clipping warnings, to make sure that no area of the image is clipped, something that I want to avoid at all cost.
The highlight and shadow clipping indicators work differently in DxO than they do in most other raw converters. Instead of turning them on for an entire session, you need to turn them on and off not only for each image, but also to show highlight and shadow clipping individually. Because this approach does take longer, it does fit in with my earlier remark about DxO being most adequate for quality rather than for quantity work.
DxO does not keep a library of images the way capture One does for example. Rather, one needs to import images in DxO each time the software is started. Thumbnails are available, and the setting files are saved, so previously opened image folders can be re-opened quickly.
DxO also has a unique approach to single-image or batch processing. The application quits while the processing is being done, and is replaced by a progress bar showing you how many images have been processed and how far along the conversion process is for each image. This means that work has to stop while DxO converts the image.
After the conversion is completed, DxO presents you with a splash screen giving you the choice of either returning to DxO to work on additional images, or to view the resulting conversion(s) in DxO. Personally, I like to view the images in Photoshop and do not use the viewing feature in DxO which, incidentally, takes place in a different window than the Raw conversion window.
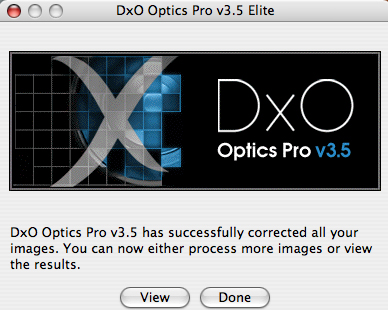
The "successful correction" splash screen in DxO 3.5
My personal approach when working with DxO is to import a single image at a time, usually by dragging & dropping it onto the Thumbnails area in DxO. I select images that need the image corrections offered by DxO, and I use another Raw Converter to browse through my Raw files prior to importing them into DxO. I then start with the automatic settings, as I mentioned, modifying them as I go based on my specific needs and my experience using the software and expecting specific results. I look at the results in Photoshop afterwards, and make additional corrections as needed, working on contrast, color and saturation. As always, I sharpen my images only at the very end of this process, and only on files sized for a specific print size.
10-Conclusions
I am pleased with the quality of the conversions done by DxO Optics Pro 3.5, and in my view the extra time spent working on my Raw conversions in DxO is justified by this quality gain.
I do, consistently, complete my image processing in Photoshop, using a workflow and several specific techniques that I have developed and that I teach in my workshops and on my CD Tutorials. While DxO exposure controls do help preserve highlights and shadows as well as control the overall tone of the image, it is not enough to deliver an image that reflects what I saw and felt in the field. However, it does provide me with a solid base to start from, and with an image that has been corrected in regards to lens defects, noise, and exposure.
To me what matters most in a Raw conversion is not the look of the file as it comes out of a raw converter. What matters most is how this file will react to the additional processing I will apply to it in Photoshop. I have found that the files created by DxO are very flexible in this regard, and can accept significant amounts of processing without exhibiting any degradation to the file, such as posterization, clipping, pixelization or other. To me this is very good news because it allows me to take these files a little further than I normally would, provided that I have this little extra leeway to work with.
I also regularly shoot at a high ISO with my 1DsMk2 --1600 or 3200-- in order to capture images in situations where a tripod cannot be set up. These high ISO settings are necessary because I need to stop the lens down to f.11 or f.16 in order to get maximum depth of field, and because I frequently photograph in low light situations. Of course, at high ISOs noise shows up in the image, and DxO proves useful in this regard as it takes a lot of the noise out. I complete noise removal with Noise Ninja or Neat Image if necessary.
At this time in the history of digital imaging, no application is an end in itself. Rather, multiple applications are needed to achieve both the vision I have for each specific image and the ultimate image quality that I seek for my work. In this approach, DxO is an essential part of what we might call my digital image processing toolkit.
A free demo version of DxO 3.5 is available at http://www.dxo.com
I recommend you download it and give it a try. Like I did, you may find that for specific photographs, DxO does make a difference in regards to image quality.
Alain
Essay and photographs Copyright © Alain Briot 2006
All rights reserved worldwide
.
|
 |
|
|
|
|